Hey ya'll. I'm sure if you're a regular follower, you've noticed that I've been slacking with my Baking Through August posts.
The reason for that is I'm actually in transit to Beijing right now! I'm actually in DC, just finished pre-departure orientation for NSLI-Y, the program I'm going through, and will leave for Beijing for an entire 9 months today.
Crazy.
But yes. I don't have internet access really right now, except in the lobby (where I'm typing this), so I haven't been able to post. Do rest assured that I baked over 31 different items throughout August, but just unfortunately won't be able to blog about them.
That being said, I'm hoping to blog while I'm in China. Unfortunately, I'm not sure if Blogger or Blogspot are blocked there. I guess we'll find out! I'll keep you updated if I change URLs. Hopefully not, but it's looking like that will be the most likely outcome. Shucks.
I'm super-dee-duper excited about this upcoming trip, and hope to share all of my adventures and observations with all of you!! This isn't the last you've seen of me!
Friday, August 30, 2013
Day 29: Iced Sugar Cookies
Remember those jam swirls I made two weeks ago? Remember how I madesome extra cookie dough to use as a base for another recipe?
Well, this wasn't the intended recipe, but it did use the rest of that dough!
After kibitzing about icing this entire time, I thought I was due to makethe icing a focus of one recipe. as most Americans do like supah sweet items (...like icing),I thought it was due time. Even though the sugar cookie is the same, as required by this quest, the icing is one I've never made before: royal icing.
It's quite majestic.

See what I did there?
Since the sugar cookie is the same, the process is just copy and pasted, with a few tweaks in the baking time.
The Sugar Cookie
The Ingredients

- 3 cups all-purpose flour
- 1 tsp baking powder
- ½ tsp salt
- 2 sticks butter, room temp.
- 1 ¼ cup sugar
- 1 egg
- 2 tsp vanilla extract
- 1 tbsp whole milk
The recipe actually calls for a tablespoon of heavy cream, but heavy cream does not exist in my fridge. Since it was such a small amount, I figured that just using whole milk would work just fine. (I was right.)
I actually ended up doubling this recipe, as it freezes really well; the recipe I made today actually used the frozen dough, and it tasted just like the first time! The ingredients shown above show the amounts for one batch, but my pictures show the amounts for two, so don't be thrown off.
The Process

Whisk together the flour, baking powder, and salt.
Use an electric mixer, and beat the sugar and butter together until light and fluffy, like freshly fallen snow.
Switch the speed to low, and add the egg and vanilla. Mix until just combined.
Slowly add the flour mixture, then milk.
And scrape down dem sides as needed! And I assure you, it will be needed at least a couple of times. No skimpin' out on me now!

This is what your dough should look like.

Lay out some plastic wrap, and squish the dough into a rectangle on top. Cover the dough with the seran wrap and store it in the refrigerator until firm, at least an hour and up to overnight, or freeze it and thaw it right before you want to bake it!
Roll the dough to ~1/4" on a floured surface using a floured rolling pin, then cut it into all sorts of fun shapes usinga paring knife or cookie cutters (duh).

Place the cookies about an inch apart on baking sheets lined with parchment paper. The original recipe says to bake for 16-19 minutes at 350F. However, I found 14-15 minutes to be perfect using convection at 325F. Just bake until the edges are slightly golden-brown. Let cool completely on wire racks before icing.
The Icing
Ingredients
1 large egg white
1/4 tsp cream of tartar
1 to 1 1/2 cups powdered sugar
The Process
Add the dry ingredients, then beat on high until ribbons/ridges form when the icing is drizzled on itself. This should takeabout 5-7 minutes.

This is what your icing should look like.
To decorate, separate the icing into small ziploc bags, then dye it. Cut off the corner, then decorate away! This process allows for really detailed piping, without requiring fancy materials. To smooth out larger areas, use a clean butter knife.
If you're icing hardens while using it, just mix it up again.
The Finished Product

The Final Verdict
The sugar cookie itself is pretty good; crispy, but not per se crunchy. The icing isa bit sweet for me (no surprise), but it decorates and hardens nicely! Plus it makes the cookies pretty stinkin' cute, heehee~.
Both recipes perform as intended. For those who don't like a ton of sugar, beware: these are both quite sugary combinations. Consider reducing the amount of sugar in the cookie dough if you want to ice them.
Wednesday, August 28, 2013
Day 28: Pizza!!
Today we're making an American via Italy classic. Something everyone loves, in our own personal styles and flavors. That's right: today, we're making pizza!

This dough recipe comes once again from King Arthur. I know I use their site quite a lot, but that's because it's just honestly really really good!
And again, like the last times I've used King Arthur, I'm not making much commentary. This recipe isn't as thorough as the others, but it's really straight forward and easy.
Plus I'm typing this in the middle of an airport on my iPad mini running on 3 hours of sleep. So YUP. Not much explanation from this chick today.
The Ingredients

The Process
Mix all the ingredients together. We also decided to add an Italian spice mix to our dough. Seems fitting for pizza, eh?


Knead the dough.
Let it rise, divide the dough, and roll it out!
Add whichever toppings you'd like, then bake*!
*We actually don't bake our pizzas in the oven. We put them in our ceramic egg grill. Which technically means I didn't bake these, but the grill really just acts like a brick oven rather than a traditional one. To grill our pizzzas, we heat the grill to 500F, then bake them for 6-8 minutes.The Final Product
This is actually of a pick before they were baked. I forgot to take one afterwards. Oooopsss. But you get the picture.
The Final Verdict
Umm is pizza ever not good? Plus you get to personalize the toppings. Andif you use a grill, it gets this nice smoky flavor (just be careful not to burn the bottom!)So yes.Very good. Very good indeed.
Monday, August 26, 2013
Day 27: Fruited Sourdough Sandwich Bread
This is my favorite sandwich bread. Instead of letting my mom make it this time, I decided to help out as well!


Obviously cut up your apples first, because no one actually just has a cup of chopped apples laying around.
 We put the dry ingredients with the starter, then add water as we begin to mix it. However, to help our mixer manage this huge quantity of dough (remember, we doubled), we put in only half the flour and water at first, then add the rest once the first portion has been pretty well mixed in. We also added a little more water than called for, as my mom prefers this dough even wetter than it already is.
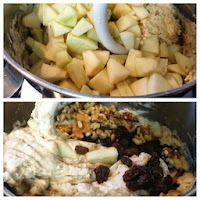
Once the flour and water have been mostly incorporated, add the apples. Once all of the flour and the apples have been mixed in, add the raisins and walnuts.

This is what your dough should look like. Ours is slightly tinged blue because of the walnuts.
To avoid this coloration, toast your walnuts. (But I personally think it's cool. Plus I'm too lazy to add another whole step.)


To cover the dough in the pans, we just used one shower cap suspended by a chopstick for both loaves.
You could also easily use a large ziploc bag.
Let the dough rise again, then bake!


This is another King Arthur recipe, just like the rolls from Fancy Eggs in a Basket. Thus, I won't need to comment as much here because the recipe itself is extremely thorough.
The Ingredients

We just used unfed sourdough, and used the full 4 tablespoons of sugar, mainly just to use up all the rest of the raw sugar we had.
We also add walnuts to our bread. Mmmm.
We doubled our recipe to make two loaves!
The Process

Obviously cut up your apples first, because no one actually just has a cup of chopped apples laying around.
 We put the dry ingredients with the starter, then add water as we begin to mix it. However, to help our mixer manage this huge quantity of dough (remember, we doubled), we put in only half the flour and water at first, then add the rest once the first portion has been pretty well mixed in. We also added a little more water than called for, as my mom prefers this dough even wetter than it already is.
Once the flour and water have been mostly incorporated, add the apples. Once all of the flour and the apples have been mixed in, add the raisins and walnuts.

This is what your dough should look like. Ours is slightly tinged blue because of the walnuts.
To avoid this coloration, toast your walnuts. (But I personally think it's cool. Plus I'm too lazy to add another whole step.)
Let the dough rise.

Though if you double the recipe, you might want to consider moving the dough to a bigger bowl, or else you'll have a huge dough-y explosion catastrophe.

To cover the dough in the pans, we just used one shower cap suspended by a chopstick for both loaves.
You could also easily use a large ziploc bag.
Let the dough rise again, then bake!
The Final Product


Some Notes
The bread is a little bit purple, again because of the walnuts. And again, I think this is cool. But I definitely got comments when I'd take this bread to lunch about the weird, somewhat concerning color.
If I Could Do It Again....
Maybe use a little less water. We used a little bit too much over what they suggested.
And use a bigger bowl for letting the dough rise. Definitely use a bigger bowl.
And use a bigger bowl for letting the dough rise. Definitely use a bigger bowl.
The Final Verdict
This bread is so goood. Fruity and nutty and sweet. And a cool color to boot! Great on it's own, or toasted, or for a PB&J. Seriously just great no matter what.
It's also nice to be able to use the unfed sourdough starter.
So if you have any sourdough started, you definitely need to make this bread! If not, you should consider starting some, because it is great for so many different recipes.
Sunday, August 25, 2013
Day 25: Easy Nutella Cookies
I saw this pin on Pinterest a few weeks back, and decided this would be a great quick cookie to try.
However, this pin seriously has zero instructions! I still decided I wanted to try these, and hash out a process for others to try.

I think I'd try reducing the amount of flour, and possibly adding more milk. Not really sure.
However, this pin seriously has zero instructions! I still decided I wanted to try these, and hash out a process for others to try.
 The Ingredients

- 1 cup Nutella
- 1 cup whole wheat white flour
- 1 large egg
- Splash of milk (~1 tbsp)
The Process
Preheat the oven to 350°F.
 Mix the Nutella, flour, and egg together. I started by using a fork, then switched to using my hands to try to incorporate everything together.
At this point, I noticed the dough was wayyyy dry and decided to add a splash of milk, though it's not in the original picture. Add however much milk as needed, using only small doses at a time.
 Grease a baking sheet. I wasn't sure how far these cookies needed to be away from, or how much they'd spread. I pressed a heaping tablespoon
into a thick cylinder, and placed them quite far away. However, the cookies didn't spread very much.
Bake the cookies for 8-10 minutes (not the same amount as the original pin). Cool on the baking sheet for 5 minutes.
The Final Product

Some Notes
These cookies are extremely dry, and really not very flavorful.
If I Could Do It Again....
I'd definitely add a teaspoon of vanilla extract.
I'd press the cookies down flatter.
I think I'd try reducing the amount of flour, and possibly adding more milk. Not really sure.
The Final Verdict
Despite what the pin claims, these cookies are NOT the best ever. In fact, they're pretty horrible. Super dry, and no flavor. So bad texture and bad taste. On top of that, flour and Nutella are pretty expensive calorie wise. Yuck yuck yuck.
I really wanted these to work. I wanted them to work so badly. It'd be so great to be able to whip these out in just a few minutes.
But no. They were horrible.
Just don't do it. Just don't.
Day 24: Whoopie Pies
Earlier this summer, I read the book This is What Happy Looks Like by Jennifer E. Smith. Total girly-girl chick lit book.
Anyway, one of the motifs in the book was this quest to find whoopie pies. I'd never even heard of them (as had neither of the main characters) and was quite intrigued.
So yes. Pretty much ever since I read that book I've wanted to make whoopie pies.
I mean seriously. After even just hearing the name "whoopie pie" I wanted to make a whoopie pie.
This recipe is already quite intricate being two completely different parts and essentially two different recipes (the cookie/cake, then the filling). But I made it even more complicated by heavily modifying this recipe and making my own. It's not necessary to read the other recipe, because I modified the entirety so much, and am just going to respell it out here and claim it as my own!


 Mix a third of the dry ingredients into the butter mixture, followed by a half of the milk.

Using a small ice cream/cookie scoop, place full scoops of the batter 3" apart on greased cookie or baking sheets. (For the picture on I spaced the dough pretty dramatically far apart; I could've fit another row.)

 Mix in the marshmallow fluff and vanilla extract.

Pair cookies of similar size together.


Anyway, one of the motifs in the book was this quest to find whoopie pies. I'd never even heard of them (as had neither of the main characters) and was quite intrigued.
So yes. Pretty much ever since I read that book I've wanted to make whoopie pies.
I mean seriously. After even just hearing the name "whoopie pie" I wanted to make a whoopie pie.
This recipe is already quite intricate being two completely different parts and essentially two different recipes (the cookie/cake, then the filling). But I made it even more complicated by heavily modifying this recipe and making my own. It's not necessary to read the other recipe, because I modified the entirety so much, and am just going to respell it out here and claim it as my own!
The Cake/Cookie
The Ingredients
- 1½ cup sugar
- 1 stick butter (room temp.)
- 2 eggs
- ¼ cup vegetable oil
- 1 tbsp vanilla extract
- 3 cups all-purpose flour
- 1 cup unsweetened cocoa powder
- ¾ tsp baking soda
- ½ tsp baking powder
- ¼ tsp salt
- [optional] 1½ tbsp espresso powder
- 1½ cup milk
- [optional] shy ¼ cup semi-sweet chocolate chips

The Process

Cream together the butter and sugar, until light and fluffy like Niall Horan's hair. Completely beat in eggs, one at a time. Then add the vegetable oil and vanilla and beat some more.

Preheat the oven to 315°F using convection, or 350°F on regular.
In a separate bowl, combine all the dry ingredients, and mix together with a fork.
 Mix a third of the dry ingredients into the butter mixture, followed by a half of the milk.
Melt your chocolate chips. They don't really have to be completely liquid, just malleable, and thus mixable. For such a small amount of chocolate chips, I just microwaved them rather than going through all the trouble of using a double boiler.
Mix another third of the dry ingredients, then the remaining milk plus the chocolate chips. Finish up with the remaining dry ingredients!

Using a small ice cream/cookie scoop, place full scoops of the batter 3" apart on greased cookie or baking sheets. (For the picture on I spaced the dough pretty dramatically far apart; I could've fit another row.)
Bake for 10-12 minutes.

Let the cookies cool on the sheet for 5-10 minutes, then remove and let cool completely on a wire rack.
Do note that when you take the cookies off the baking sheet, there will be some residue left. By greasing the sheets, you'll be able to easily scrape off this residue and use them again. (If you don't grease, the residue will require scrubbing and washing to get off, and you'll have to use a brand new sheet to cook any remaining batter you have, which you will definitely have!)
The Filling
 |
| I hope you're laughing at the little brother photo-bomb. |
The Ingredients
- 2 sticks butter (room temp.)
- 1 ¾ cup powdered sugar
- 1½ cup marshmallow fluff
- 1½ tbsp vanilla extract
- ±½ cup milk
The Process
Cream the butter and powdered sugar until light and fluffy like a cumulus cloud.
 Mix in the marshmallow fluff and vanilla extract.
Add in the milk in small doses, until you reach the consistency you'd like for your filling.
Sorry for the lack of pictures! Since I completely changed the ingredients for the filling, I kept going back and adding a little bit more of this and a little bit more of that until I got the filling I wanted. In other words, I didn't have a direct and clear cut process to photograph!
The photograph to the right is what your filling should sort of resemble.
Putting It All Together

Spread a thick layer of filling on the underside of each cookie. I found using a butter knife worked best.
Squish the two cookies together, and voila!

Whoopie! A whoopie pie!!
The Final Product


Some Notes
The "cookies" are really more like cake. In fact, they're exactly like devil's food cake. To short cut the process, just use a box of devil's food cake mix.
The filling is pretty dense. Don't put it in either heat nor cold, because the filling will either melt or become super stiff and hard. These do just fine in room temperature.
This makes about 20 large whoopie pies.
The amount of filling made is absolutely plenty, for super-stuffed whoopie pies at that (even bigger than the one pictured)! If you'd like just a regular amount of filling, I'd half the recipe.

To make mini whoopie pies, grease the bottom of a muffin sheet, and put in only enough batter to cover the bottom. Also please drastically reduce the amount of batter/filling you make or else you'll have a zillion mini pies.
I just don't even want to think about the calorie count. If I don't know what it is, that means it doesn't count, right? Ignorance is bliss!
If I Could Do It Again....
I think it'd be cool to try to make a healthier version of the filling using yogurt, maybe some egg whites. I just think this would be super cool for some reason.
The Final Verdict
Oh my goodness these things are so good. I mean, I've never actually had a whoopie pie before, so I don't have anything to compare it to as far as this specific version. But seriously these are so good. Just. So good.
Please go make some. Please.
Friday, August 23, 2013
Day 23: Peach Spice Squares
I found this recipe from my trusty ol' friend Cookiemania by Jeri Dry and Alix Engel, and thought it'd be just peachy to make.


Preheat the oven to 350°F.


My love of bad puns is slightly embarrassing. Slightly.
The Ingredients
- 1½ cups white whole wheat flour
- 1 tsp cinnamon
- ½ tsp nutmeg
- ½ tsp allspice
- ½ tsp baking soda
- 1 tsp orange rind
- 1 stick butter
- 1 cup brown sugar
- 1 egg
- 15oz can peach slices
- ±1 cup raisins
- ±½ cup chopped walnuts

The recipe itself doesn't actually specify what kind of flour to use. Looking at all the ingredients, I decided it would be easy to make this a little healthier by using white whole wheat rather than all-purpose.
The original recipe calls for ½ tsp of ginger, but I don't have that, so I replaced this ingredient with nutmeg. It also calls for a 16oz can of peaches, but those don't exist, at least not anymore. Gotta make do with whatcha got.
I used ½ cup golden raisins, and ½ cup regular raisins.
The Process

Preheat the oven to 350°F.
Using an electric mixer, cream the butter and brown sugar together until light and fluffy, like an eevee.
Beat in the egg.
Drain your peaches well, and stir them into the mix by hand.
 Grate your orange rind. To get one dense teaspoon, I had to grate about ¾ of a medium orange.
In a separate, small bowl, mix together the flour, baking soda, spices,
and orange rind.
If you're using a standing mixer, these steps can be done while the blending occurs.
Stir in the dry mix by hand. I stirred in half at a time to make it easier.
Then add the walnuts and raisins, and stir those in as well.
Don't be surprised if your peaches don't stay completely in tact while you mix everything together; this is perfectly fine, and expected!
 The original recipe said to grease an 11"x16" baking pan/sheet, then spread the dough evenly across the entire pan. I found that I just didn't have enough dough for this, so I just spread it out as far as I could, then made a straight raw edge.
I think the reason I might not have had enough was that the recipe might have intended the peaches to be somewhat blended (with an electric mixer) into the liquid mix, which would have added some more volume. However, it's not clear at all whether you're actually supposed to do this or leave the slices in tact. (Don't ya love confusing, unspecific recipes?) I decided I wanted to have big peach chunks, rather than have it almost pureed throughout the batter.
I also had 1oz less peaches than intended, but I don't think that would have filled up the entire baking pan.
Bake 15-20 minutes, until the dough begins to pull away from the sides of the pan.
It doesn't actually really matter how long you let it cool before you begin to cut the sheet into squares, but I'd say to let it cool at least little bit.
The cake (it's not really a cake, but I don't know what else to call it) is quite moist, which makes it super easy to cut. I just used a small metal spatula with a sharper edge. The moistness also makes it a little crumbly though. Also it is just impossible to cut walnuts cleanly, so expect to be missing small tiny spots where a walnut popped out of the cake when you tried to cut in its path.
The Final Product


Some Notes
These squares are super flavorful, with both the spices, and then the raisins and peaches on top of that.
The raisins or walnuts are optional, but I'd definitely make sure to have at least one or the other in the recipe. You could replace the raisins with craisins. If you really don't want raisins, walnuts, or craisins in your recipe, you could add another half can of drained peaches (though seriously if you don't want any of these in your recipe just why have you read this far).
The entirety of this recipe is 2850 calories. If you cut it into 25 pieces, that would be 114 calories per square. Which isn't too horrible. And 1/3 of those calories come from the peaches, raisins, and walnuts; at least those parts are healthy calories!
If I Could Do It Again....
I'd use ginger instead of nutmeg, like the original recipe called for.
I'm not sure if it'd be worth it to cut the peaches into big chunks. Since it would be so easy, I think I would cut the slices into either halves or fourths before adding them to the batter. This would just make it more evenly distributed (I had some clumps with lots of peaches, and some with hardly any).
I'd replace the brown sugar with a cup of applesauce, and also half the butter to reduce the amount of liquid in the recipe. This would reduce the recipe by a whopping 1000 calories!! Whoop whoop!
The flavor of the applesauce would also compliment the spices and fruits and nuts so seriously I think it'd be perf.
I'm not sure if I'd use a 9"x13" pan. Hrmmm. Don't think so; what I did this time worked perfectly. Using a 9"x13" pan would probably be a bit too small, which would thicken the squares and make the baking time a little trickier. Things to keep in mind if you do decide to try a smaller pan.
The Final Verdict
This recipe is definitely not lacking in flavor! It really packs quite a punch. Determine for yourself whether this is a good or bad fact.
Not my absolute favorite recipe, but it's not horrible by any means! It's also definitely healthier than most of the other ones I make. I'll definitely be remaking this recipe with apple sauce - sure hope that works because that would seriously be awesome!
This recipe would make for a good school lunch desert, or an after-school snack.
Thursday, August 22, 2013
Day 22: Fancy Eggs in a Basket
I'd actually planned to make these as a surprise for my little brother's first day of school. Imagine how nice it'd be to wake up to crunchy rolls filled with eggs to start off your junior year. But then he went to go eat breakfast with a bunch of friends. Poopstain.
But I still wanted to make these. So I did.
Great logic skills, I have.


 Cut off the tops of the rolls with a serrated knife.
 Place the rolls on a baking sheet, then crack an egg to the middle.


But I still wanted to make these. So I did.
Great logic skills, I have.
The Rolls
The rolls are these Crusty Hard Rolls from King Arthur. This recipe is actually a bit longer than all the others I've every linked, but it is extremely thorough. In fact, I hope you read it and think "This reminds me of Simplee Selene!" And since it is so thorough, I'm just going to post pictures of my process, because this recipe leaves nothing to be explained.
So in the end you'll probably read the same amount anyway. Whoooooooo~~~!


The Eggs in a Basket
 Cut off the tops of the rolls with a serrated knife.
Using your fingers, hollow out a hole in the roll that's big enough to fit whatever sized eggs you're using.
 Place the rolls on a baking sheet, then crack an egg to the middle.
Season, and bake for 20-25 minutes.
Note that if any egg white spills over, it will make the roll stick to the bottom of the pan.

I had some rolls that were too small to fit a large egg inside. Instead of just leaving them plain, I decided to still hollow them out, and instead fill them with scrambled eggs. In a pan, I half-cooked some scrambled eggs, then simply poured them into the rolls.
Bake these for only 15 minutes.
The Final Product


Some Notes
The fork and knife in the final pictures are kinda silly, because you should definitely just eat these with your hands.
These rolls are really good by themselves, and are still good after several days. I actually baked the rolls four days before I used them for the eggs in a basket, and they were just fine.
I originally had 12 rolls, but a few got eaten before I used them with the eggs.
The second bake will make the rolls supah crunchy - not brick-like, but definitely takes a little more force to bite into. On this note, I don't suggest toasting the sliced tops, because since they are so small, they will become as hard as bricks.
I seasoned my eggs with salt, pepper, and dried parsley. Some other ideas for toppings: cheese, a splash of milk, ham, tomatoes.
If I Could Do It Again....
Instead of making 12 rolls, I'd make 10 larger ones, to make sure the whole eggs could fit inside.
I'd try a few different seasonings!
I'd try a few different seasonings!
The Final Verdict
Pretty good! And not horrible to make, especially since you can make the rolls days in advance. The most time consuming part is probably hollowing out the rolls; you could also do this the night before, just be sure to put them in an air-tight container.
Personally, I prefer the whole egg version, which also is a little easier to make, since you don't have to do anything but crack the egg.
However, the scrambled egg version isn't bad! It could easily be spiced up with a few different seasonings. It'd also make a great hors d'oeuvre if placed in an even smaller, mini roll.
So yes, I'd make both the rolls plain and these eggs in a basket again!
Subscribe to:
Comments (Atom)